A water level indicator is a useful like that to monitor the water level in a tank or container that may be useful in avoiding unnecessary floods and cutting the waste of water. Though there are different choices like the commercial ones, the do-it-yourself water level gadget can become an interesting and cheap way of doing it. The article is going to help you go through the process one at a time, by smartly and easily available parts.
What Is a Water Level Indicator?
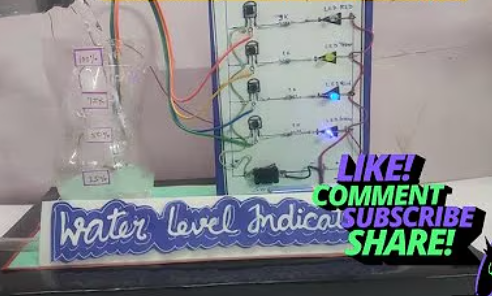
A water level indicator is an essential element that is a part of a system that measures and indicates the level of water in a container. It usually works with the help of sensors that are used to detect the water level. Then, these LEDs, whose colors represent different levels of the rising or falling of water, starts blinking along with the respective color. Also, alarms or other lights could be used.
Materials Required
Here’s a list of components you’ll need:
| Component | Quantity | Description |
|---|---|---|
| Conductive Wires | 5 | For connecting circuit elements |
| LEDs (Red, Green) | 3-4 | To display water levels |
| Resistors (220 Ohm) | 3-4 | To protect LEDs |
| Metal Probes | 3-4 | For sensing water levels |
| 9V Battery | 1 | Power source |
| Battery Clip | 1 | For connecting the battery |
| Breadboard/PCB | 1 | Circuit assembly |
| Buzzer (Optional) | 1 | For audio alerts |
Step-by-Step Instructions
1. Prepare the Metal Probes
- Attach conductive wires to each metal probe.
- Space the probes vertically inside the water tank at different levels.
2. Assemble the Circuit
- Connect the probes to the corresponding LED terminals through resistors.
- The longest probe should connect to the ground.
- Connect the positive end of the battery clip to the power rail of the breadboard.
3. Connect the LEDs
- Place the LEDs on the breadboard.
- Ensure each LED is connected to a resistor to avoid damage.
- The cathode (shorter leg) of each LED should be connected to the negative terminal.
4. Install the Buzzer (Optional)
- Connect the buzzer in parallel to the highest-level LED.
- This will trigger an audio alert when the tank is full.
5. Power Up the Circuit
- Attach the battery clip to the 9V battery.
- Check if the LEDs light up according to the water level.
Related – Fire Fighting robot
Why Make a DIY Water Level Indicator?
- Cost-Effective: Saves money compared to purchasing a commercial system.
- Personalized Features: Tailored to your specific needs.
- Eco-Friendly: Helps conserve water by preventing overflow.
- Educational: A great learning project for electronics enthusiasts.
Testing the System
Add water slowly to the tank.
Notice that the lights turn on in a sequence as the water level is gradually going up.
See to it that the highest level LED and the buzzer actuate when the tank is already full.
Troubleshooting Tips
LEDs are Not Lighting Up: Ensure the links and resistors are properly installed.
The Buzzer is Not Working: Check if it is connected as it should and if it is okay.
Intermittent Signals: Rub the probes off so that they conduct correctly.
Applications of a Water Level Indicator
Home Water Tanks: Automatic shutdown and savings cause zero water wastage.
Industrial Use: Smooth monitoring of the water contents of storage tanks.
Rainwater Harvesting Systems: The device is switched of water collection every few seconds.
Benefits of DIY Water Level Indicators
Saving Money: Uses the cheapest materials.
Water Saving: Defective water leakage is avoided by providing caution signals.
Customization: The sensor can be adapted to different dimensions of a tank.
Eco-Friendliness: The use of water is an ecologically friendly practice and it requires a high sense of responsibility.
Safety Precautions
Be cautious when handling electrical components.
In order to prevent short circuits.
Conclusion
Building a DIY water level indicator is a rewarding project that promotes resource conservation and offers practical benefits for everyday life. By following the steps outlined above, you can create a functional system tailored to your needs. Happy tinkering!