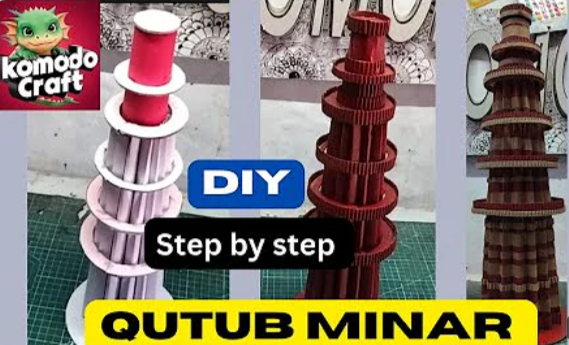
Making a 3D model of the Qutub Minar is a fun and educational way to learn about one of India’s most famous historical monuments. I have inserted a video below for Better understanding.
Materials Needed
Here’s a list of materials you will need to make a simple and realistic 3D model of the Qutub Minar:
- Cardboard rolls (like the ones from tissue paper or wrapping paper)
- Chart paper (red and beige colors work best)
- Craft foam
- Glue or a hot glue gun
- Scissors
- Paints (red, brown, and cream colors)
- Paintbrushes
- A ruler
Steps to Make the Qutub Minar Model
Step 1: Study the Structure of Qutub Minar
Before you start, it’s important to understand how the Qutub Minar looks. The monument has five stories, each marked by a balcony. The lower three stories are made of red sandstone, while the top two are made of marble and sandstone. The base is wide and narrows as it rises to the top, like a cone.
Step 2: Create the Base of the Minar
- Cut a piece of sturdy cardboard into a circle about 12 inches in diameter. This will be the base of your model.
- Cover the cardboard base with green or brown chart paper to represent the ground.
- You can add small clay models of trees or pathways around the base for extra detail.
Step 3: Build the Main Tower
- Take your cardboard roll to form the main tower. If you don’t have a long enough roll, you can join two or more rolls together using tape or glue.
- Cover the roll with red chart paper to mimic the red sandstone used in the real Qutub Minar.
Step 4: Add the Balconies
The Qutub Minar has circular balconies separating each floor. Here’s how to make them:
- Cut out rings from cardboard to fit around the tower.
- Wrap the rings with beige chart paper to make them look like stone.
- Attach these rings to the tower at even intervals using glue.
Step 5: Make the Top of the Minar
- The top of the Qutub Minar has a dome-like structure. To make this, roll a piece of paper into a cone shape and secure it with tape or glue.
- Cover the cone with beige paper or paint it cream.
- Attach the cone to the top of the tower using glue.
Step 6: Add Details to the Tower
- Use a ruler and pencil to draw small vertical lines on the red chart paper covering the tower. These lines represent the intricate carvings on the real Qutub Minar.
- If you want, you can also draw designs or write Arabic calligraphy patterns with a fine-tipped marker to make it more realistic.
Step 7: Add Finishing Touches
- Paint over any exposed areas to ensure your model looks neat and polished.
- You can sprinkle a little glitter or add tiny decorative stones for extra charm.
- Label your model with a small flag or card reading “Qutub Minar” to let everyone know what it is.
Understanding the History of Qutub Minar Model
While building your model, it’s a good idea to learn a bit about the monument so you can explain it during your presentation.
- When was it built?
The Qutub Minar was built in 1193 by Qutub-ud-din Aibak and completed by his successors. - Why is it important?
It is one of the earliest examples of Indo-Islamic architecture in India. The tower was built to celebrate the victory of the Mamluk dynasty. - How tall is it?
The Qutub Minar stands at 73 meters (240 feet) tall and has 379 steps inside.
Ideas to Make Your Model Unique
Here are some ways to make your Qutub Minar model stand out:
- Add a Landscape: Include a small park or garden around your tower. Use green paper, clay, or artificial grass to make the landscape.
- Use Lighting: Add tiny LED lights inside the tower to make it glow.
- Include the Iron Pillar: The famous Iron Pillar is located near the Qutub Minar. You can add a small clay or cardboard pillar to your base.
- Make a Fact Sheet: Write down important facts about the Qutub Minar and place it next to your model.
Why This Project is Fun
Creating a 3D model of the Qutub Minar is more than just a school project—it’s a chance to explore history, architecture, and your creativity. By the end of this project, you’ll not only have a great model but also a deeper understanding of this incredible monument.
Conclusion
Making a 3D model of the Qutub Minar is a fun and educational activity that lets you showcase your creativity and learn about history at the same time. Follow these steps, and you’ll have a fantastic project that’s sure to impress your teachers and classmates.
Now, gather your materials and start building your own mini Qutub Minar. Have fun, and good luck with your project!
Way cool, some valid points! I appreciate you making this article available, the rest of the site is also high quality. Have a fun.