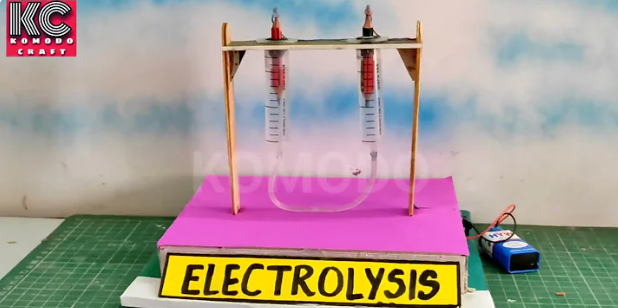
How to make electrolysis working model for school project
Creating a electrolysis working model in few easy steps: (Science electrolysis working model )
Materials You’ll Need
Here’s a list of items, But all the details given in video below
- A piece of cardboard
- 2 pencils
- A 9-volt battery
- Battery clip with wires
- Water
- baking soda
- Two small injections
- Tape
Table of Contents
Table of Contents
Step-by-Step Instructions
Step 1: Prepare the Electrodes
- Sharpen both pencils on both ends so the graphite core is exposed.
- These pencils will act as your electrodes, conducting electricity in the water.
Step 2: Set Up the Container
- Fill the plastic container pr injections with water.
- Add a teaspoon of salt or baking soda and stir it well.
- This makes the water more conductive, helping the electricity flow.
Step 3: Attach the Electrodes
- Place the two pencils in the water so their tips are submerged but not touching each other.
- Use tape or a rubber band to hold the pencils in place on the sides of the container.
Step 4: Connect the Battery
- Attach the battery clip to the battery.
- Connect the two wires from the battery clip to the two pencils:
- One wire goes to one pencil, and the other wire goes to the second pencil.
Also Check – Hydroponic farming working model
Step 5: Collect the Gases
- Take the two small test tubes or injections and fill them with water.
- Carefully turn them upside down and place them over the pencil tips in the water.
- Make sure no air bubbles are inside the test tubes.
Step 6: Observe
When you connect the battery, you’ll see bubbles forming around the pencil tips.
- At one pencil tip (the cathode), hydrogen gas is being released.
- At the other pencil tip (the anode), oxygen gas is being released.
Over time, you’ll notice more bubbles collecting in the test tubes. The hydrogen gas will fill up faster because water has twice as much hydrogen as oxygen!
How Does This Work?
The power from the battery separates the water atoms (H₂O) into their parts:
Hydrogen (H₂): Structures at the negative terminal (cathode).
Oxygen (O₂): Structures at the positive terminal (anode).
This is the enchantment of electrolysis in action!
Tips to Make It Even Better
- Use food shading to make the water look really energizing.
- Mark the test tubes “Hydrogen” and “Oxygen” to make sense of the analysis.
- Add a little banner or diagram making sense of how electrolysis functions.
Safety First!
- Make sure you handle the battery and wires carefully.
- Ask an adult to supervise your experiment to ensure everything is safe.
Final Thoughts
Building an electrolysis working model is an excellent way to learn about science while having fun. It’s straightforward, instructive, and will without a doubt intrigue your school crowd. So get your materials and begin testing — you will shake this undertaking! 😊
Best of luck with your science experience!
Conclusion
In this article, Creating a electrolysis working model was a joyful experience you and us. Visit our youtube channel for more models like this.
FAQ
How to make electrolysis working model 2024?
For creating electrolysis working model Visit Komodocraft.com. komodo craft serving you the best models like science working models, math models, physics models.
Making electrolysis working model for school exhibition is good?
Yes, its excellent to choose electrolysis working model for school exhibition, visit Komodocraft.com For creating electrolysis working model.