Creating a Capacitor Charging & Discharging Model for school project in few easy steps :
| Materials | Required |
|---|---|
| 1. A capacitor | 5. A battery 9V |
| 2. A switch | 6. An LED |
| 3.Wires | 7. Resistor |
| 4.Tape or glue | 8. Cardboard |
Table of Contents
Table of Contents
Steps to Make the Model
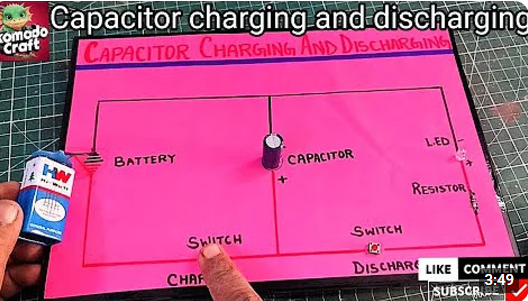
Step 1: Understand the Circuit
- When you connect the battery, the capacitor charges up and stores energy.
- When you disconnect the battery and connect the capacitor to the LED, it releases the stored energy, making the LED glow.
Step 2: Arrange the Components
- Set up the battery: Connect one wire to the positive (+) terminal and another to the negative (-) terminal of the battery.
- Place the capacitor: Connect the capacitor’s legs to the circuit:
- The longer leg is the positive (+) side, and it goes to the battery’s positive terminal.
- The shorter leg is the negative (-) side, and it connects to the battery’s negative terminal.
- Add resistor: Place the resistor between the battery and the capacitor. This slows down the charging process, making it easier to observe.
Step 3: Add the Switch
- Connect a switch between the resistor and the capacitor.
Also Check – Statue of Unity 3D Model
Step 4: Connect the LED
- Attach the LED to the capacitor:
- The longer leg of the LED connects to the capacitor’s positive side.
- The shorter leg connects to the capacitor’s negative side.
- The LED will light up when the capacitor discharges.
Step 5: Test Your Model
- Turn on the switch to connect the battery. Watch as the capacitor charges. (You may not see anything happen yet.)
- Turn off the switch to disconnect the battery.
- Now, connect the capacitor to the LED. The LED will glow briefly as the capacitor discharges its stored energy!
How It Works
- Charging: When the switch is on, the battery sends energy into the capacitor, storing it as an electric charge.
- Discharging: When the capacitor is connected to the LED, it releases the stored energy, making the LED glow.
Extra Tips
- Add Labels: Label the capacitor, LED, and switch on your model to make it easier for everyone to understand.
- Experiment with Capacitor Sizes: Try using different capacitors to see how the charging and discharging time changes
Visit Komodo Craft

Welcome to Komodo Craft , your destination for guidance on school projects, models, assignments, and art and craft. We are a team of well-trained artists and craft experts dedicated to helping students excel in their school exhibitions and competitions.
Contact us today to learn more about our services and how we can help you excel in your school projects and exhibitions.
Email: [shakunkumar55@gmail.com]
YouTube Channel: [Komodo Craft]
FAQ
How to Make Capacitor Charging & Discharging Model?
Capacitor is a very important component of this model . When connected to a 9 V battery, the capacitor stores electrostatic energy. This article help you for making this model step by step. This article was first published on
Steps to make Capacitor Charging & Discharging Model?
Steps to make Capacitor Charging & Discharging Model : This article help you for making this model step by step. This article was first published on Komodo Craft.