Creating the area of a circle working model for school project . lets take a look on formula of area of a circle.
Materials Needed
- A 4 sheet of colored chart paper
- scissor
- A compass (for drawing circles)
- A ruler
- Glue or tape
- A marker
- cardboard
- Thread
- Nut Bold
Table of Contents
Table of Contents
Steps to Make Area of Circle Model
Step 1: Draw and Cut Out a Circle
- Take your colored chart paper and use a compass to draw a circle.
- Make sure the radius is easy to measure, like 7 cm or 10 cm.
- Cut out the circle carefully with scissors.
Step 2: Divide the Circle into Equal Parts
- Use a marker to draw straight lines across the circle, dividing it into equal “parts” or sectors. Start by dividing it into four parts, then eight, and finally sixteen.
- The more parts you make, the better your model will be made.
- Number each part.
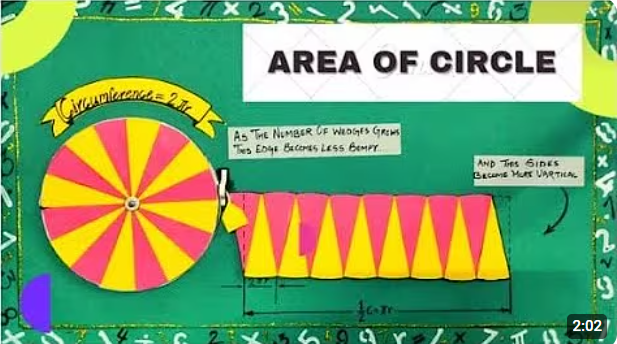
Step 3: Rearrange the Parts
- Take all the parts and start arranging them in an alternating pattern (up and down) to form a shape like a rectangle.
- Place the curved edges of the slices together to create the longer sides of the rectangle.
- Glue or tape the slices onto the cardboard base to hold them in place
Step 4: Label the Model
- Write “Base = π × r” on one long side of the rectangle (the curved edges combined form this length).
- Write “Height = r” on the shorter side (the radius of the circle).
Step 5: Test the Model
Now that your model looks like a rectangle, it’s easy to see how the area of a circle is derived:
watch video carefully and follow all the steps.
Recent Math Model – Math Additional Working Model
How This Model Helps
- By dividing the circle into slices and rearranging them, you visually show how the area formula works.
- It makes the concept easier to understand for you and others.
- Your teachers will appreciate the effort and creativity.
Tips to Make It More Cooler
- Use bright colors to make your model attractive.
- Decorate the base with fun doodles or labels about the area of the circle.
- Add a small write-up or a key explaining the process to go along with your model.
Conclusion
Making a working model for the area of a circle is not just about getting good grades, it’s about learning a new way that sticks with your mind. By building this project, you’ll not only understand the formula better but also have fun when using it.
Visit our Youtube Channel for Models Like this, Thankyou.
FAQ
Why should I create a working model for the area of a circle?
A working model is a fun and interactive way to learn mathematical concepts. It helps you visualize how the formula for the area of a circle works, making it easier to understand, it’s an impressive school project that showcases your creativity and knowledge.
How does the model explain the area of a circle formula?
Dividing the circle into slices (sectors).
Rearranging the slices into a rectangle-like shape.
Showing that the rectangle’s base = π × r and height = r.
When you multiply the base and height of the rectangle, you get the formula for the area of the circle: π × r². For more visit – Komodo Craft
How to Make Area of Circle working model at Home
Creating the area of a circle working model for school project . lets take a look on formula of area of a circle,
Area of circle = π × r². Visit Komodo Craft more step by step making