Wheatstone Bridge Working Model–A Powerful Science Project with 6 Amazing Applications

Wheatstone Bridge:
यह एक ऐसा electrical circuit होता है जिसका उपयोग किसी भी unknown resistance (अज्ञात प्रतिरोध) को measure करने के लिए बनाया जाता है। इसको सबसे पहले Samuel Hunter Christie ने 1833 में बनाया था और बाद में Sir Charles Wheatstone ने 1843 में popular किया था। इसी कारण इसका नाम Wheatstone Bridge पड़ा।
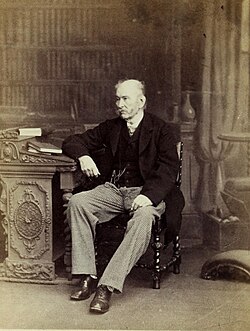
Samuel Hunter Christie
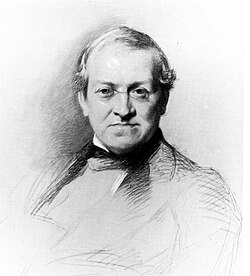
Charles Wheatstone
Principle (सिद्धांत):
Wheatstone Bridge Null Deflection Method के अनुसार काम करता है। इसका अर्थ यह है कि चार resistors को एक quadrilateral shape में जोड़ते समय बीच में एक galvanometer लगाने पर, यदि resistors का ratio balance हो जाए तो galvanometer में zero deflection की स्थिति होती है।
Formula:
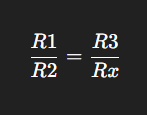
यहाँ पर:
R1 और R2 = ज्ञात (known) resistances
R3 = चर (variable) resistance
Rx = अज्ञात (unknown) resistance
इस formula की मदद से हम Rx यानी unknown resistance को निकाल सकते हैं।
Materials Required (आवश्यक सामग्री):
Wheatstone Bridge working model बनाने के लिए बहुत simple items चाहिए:
- Wooden board या thermocol base
- 4 resistors (2 fixed, 1 variable, 1 unknown) /4 LED
- Connecting wires
- Battery (6V या 9V)
- Galvanometer या LED
- Switch (key)
- Chart paper और labels (presentation के लिए)
Construction (निर्माण):
- Base पर resistors को diamond shape में fix किया जाता है।
- Galvanometer दो opposite junctions (B और D) के बीच connect किया जाता है।
- Battery दूसरे दो junctions (A और C) में connect किया जाता है।
- एक branch में variable resistor लगाया जाता है ताकि circuit को balance किया जा सके।
- पूरे model को साफ wiring और chart paper labeling के साथ present किया जाता है|
Working (कार्य प्रणाली):
battery on होने पर current दोनों branches में flow करता है।
अगर galvanometer deflect होता है तो इसका अर्थ होता है कि bridge unbalanced है।
Variable resistor adjust करके galvanometer को zero deflection position पर पारित किया जाता है।
इस stage को balanced condition कहा जाता है।
अब formula use करके Rx यानी unknown resistance calculate किया जाता है।
Applications (उपयोग):
- Resistance Measurement: यह सबसे basic use है, जिसमें किसी भी unknown resistance का मान निकाला जाता है।
- Strain Gauge Measurement : Mechanical engineering में Wheatstone Bridge से strain gauges को connect किया जाता है ताकि stress और strain measured किया जा सके।
- Temperature Measurement :Wheatstone Bridge में thermistor अगर लगाया जाए तो वह temperature को sense कर output प्रदान करता है।
- Light Measurement: Photoresistor को इस circuit में जोड़ने से light intensity measured की जा सकती है।
- Industrial Use: Automation और sensor-based control systems में इसका use होता है।
- Educational Purpose: यह स्कूल और कॉलेज science practicals और exhibitions के लिए बहुत ही useful model है।
लाभ (Advantages):
- Resistance measurement बहुत accurate माध्यम से करता है।
- Construction simple और आसानी से समझा जा सकता है।
- Sensors जैसे strain gauge, thermistor, photoresistor के साथ उपयोग किया जा सकता है।
- Education और industry दोनों क्षेत्रों में उपयोगी है।
- Wheatstone Bridge as a School Project (स्कूल प्रोजेक्ट में महत्व):
Wheatstone Bridge working model स्कूल और कॉलेज दोनों जगहों के लिए एक ideal science project है।
यह students को Ohm’s Law और resistance concept practically समझाता है।
Low cost materials से आसानी से बनाया जा सकता है।
Presentation के लिए colorful wires, LED indicators और chart papers use करने से यह model और attractive बन जाता है।
Students के लिए यह project science exhibition में बहुत informative और appealing साबित होता है।
Conclusion (निष्कर्ष):
Wheatstone Bridge Working Model एक ऐसा साइंस प्रोजेक्ट है जिसमें theory और practical दोनों मिलाता है। इसका नियम simple है लेकिन इसका application industry, engineering और education में बहुत crucial है।
यदि आप किसी school science exhibition या classroom presentation के लिए प्रोजेक्ट ढूँढ रहे हैं तो Wheatstone Bridge एक perfect option है। यह न केवल आपकी creativity प्रदर्शित करेगा बल्कि आपके science concepts को भी मजबूत करेगा।
Watch The DIY Video
VISIT OUR MAIN WEBSITE : click here
ALSO READ OUR WINDMILL DIY KIT : click here
YOU CAN BUY OUR KITS FROM HERE :